Mike Bartick: Effective Snooting
It wasn’t too long ago when Keri Wilk swept the competitions with his stunning macro images created with a snoot. At a time when only a handful of people even knew what a snoot was, he produced some show stopping images that were as ahead of the curve then, as they are today. Very few tools can actually add a new layer to your portfolio as effectively as a snoot can, they are relatively inexpensive, hard to break, and travel quite easily. In fact, buying a snoot should be thought of along the lines as a lens buy as they will add that much of a new dimension to your portfolio and skills.
What is a snoot? a snoot is a device that is used to control strobe flash in an image. Snoots don’t produce light but help to channel the light for dramatic placement and effect. Often times its not whats in the image with snooting, but whats not in the image. In otherwords, using a snoot also helps to eliminate a fussy background or confusing substrate by illuminating just your target, isolating them, while the rest of the frame remains dark. They can also be used for backlighting, fill lighting or surrounding your subject with light, its really up to the user to apply their own creative mojo to see how much juice can be squeezed out the image making process. One thing is for certain though, that once you begin to use your snoot effectively, the habit will be hard to break, and soon, everything must be snooted!
There are basically two types of snoots on the market, fiber optic snoots and optical snoots. Both have a base that fits over the strobe head and function in similar ways. However both have distinct differences in ease of use and effect.
A few question I would ask when researching to buy a snoot:
Ease of use-Is the device easy to put on and take off underwater.
What is the scope of use, can i shoot with a wider angle of view and super macro?
Will I be able to operate the device on my own and not have a guide hold it?
Do I like the quality of light that it delivers at higher F-stops?
Mastering the basics before mastering your snoot: The basics for using a snoot can be broken down to a single simple phrase, “controlling the light.”For the best results, use the following settings:
Jump Settings for using a Snoot: ISO-100/Low ISO to control ambient light Shutter speed 1/200-Further eliminates ambient light and keeps the image sharp. F-Stop- F18 and higher-Controls the color, depth of field and ultimately the light quality. Strobe power- 3/4 power-if the strobe power isn’t strong enough, open the aperture slightly. For super macro images, increase the ISO from 100 to 360. I don’t recommend using your snooted strobe on full power as the strobe head becomes quite hot. Taking a break for a few minutes during intense use, will also help the strobe to perform better.
On Camera and setting up to shoot: I’ve recently changed to using fiber optic cables to fire my strobes. This allows me to unplug one strobe and plug in another while underwater. Many times, ill keep a third strobe on me or attached to my camera with the snoot attached to it. I also use a long FO cable so that i’m able to use my strobe off camera with a lot more freedom.
For my favorite gear setup I use two float arms on both sides of my rig, a 6-inch arm and an 8-inch arm, longest first to give me distance and the shorter arm on the end for better articulation. I mention this as its important to have the extra reach when its needed.
Use your snoot on the left strobe so that you can make adjustment’s to light placement with your left hand while looking through the viewfinder and adjusting your camera settings with your right hand. This will also help you to balance the rig underwater and gain stability. The higher your snoot tip is from your subject, the wider the beam cast will be and with less intensity. Moving the snoot tip closer to your subject shrinks the light pool and increases the intensity.
When mounting your snoot onto your strobe head, try to place it exactly the same way every time. You will further gain muscle memory when using your strobe and be able to concentrate on the more important things, like shooting.
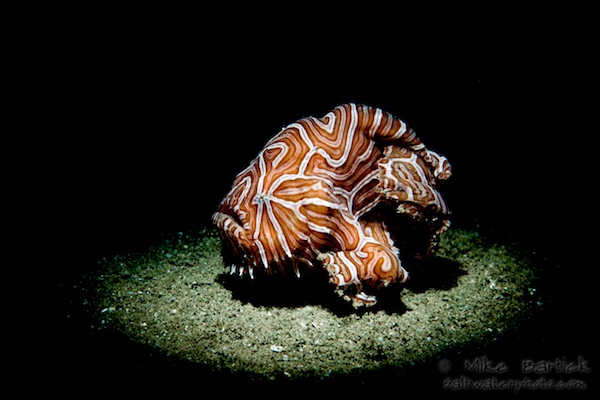
.jpg)
Nikon D500
105mm F32 @ 1/200
1 YSD2-J strobe
Retra snoot
1 kraken hydra 1k torch for backlight
The Optical snoot offers a sliding mask that will allow you to shrink the light pool that surrounds your subject without moving the snoot up or down. Take a few test shots and make your adjustments then move on to creating the image you like. Watch for shadows on your subject in the foreground and be diligent when reviewing the image underwater.
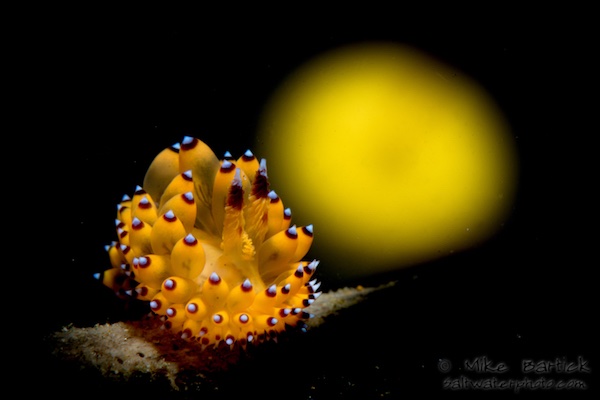
.jpg)
Nikon D7100
105mm
F29 @ 1/320
1 YSD2 Strobe Retra snoot
Nudibranchs are one of my favorite targets when using a snoot as they usually move relatively slow, are beautiful and colorful. A typical snoot shot surrounds the subjects with light, while keeping negative space within the frame. The idea is to see the snoot working and the skill of the shooter.
-2.jpg)
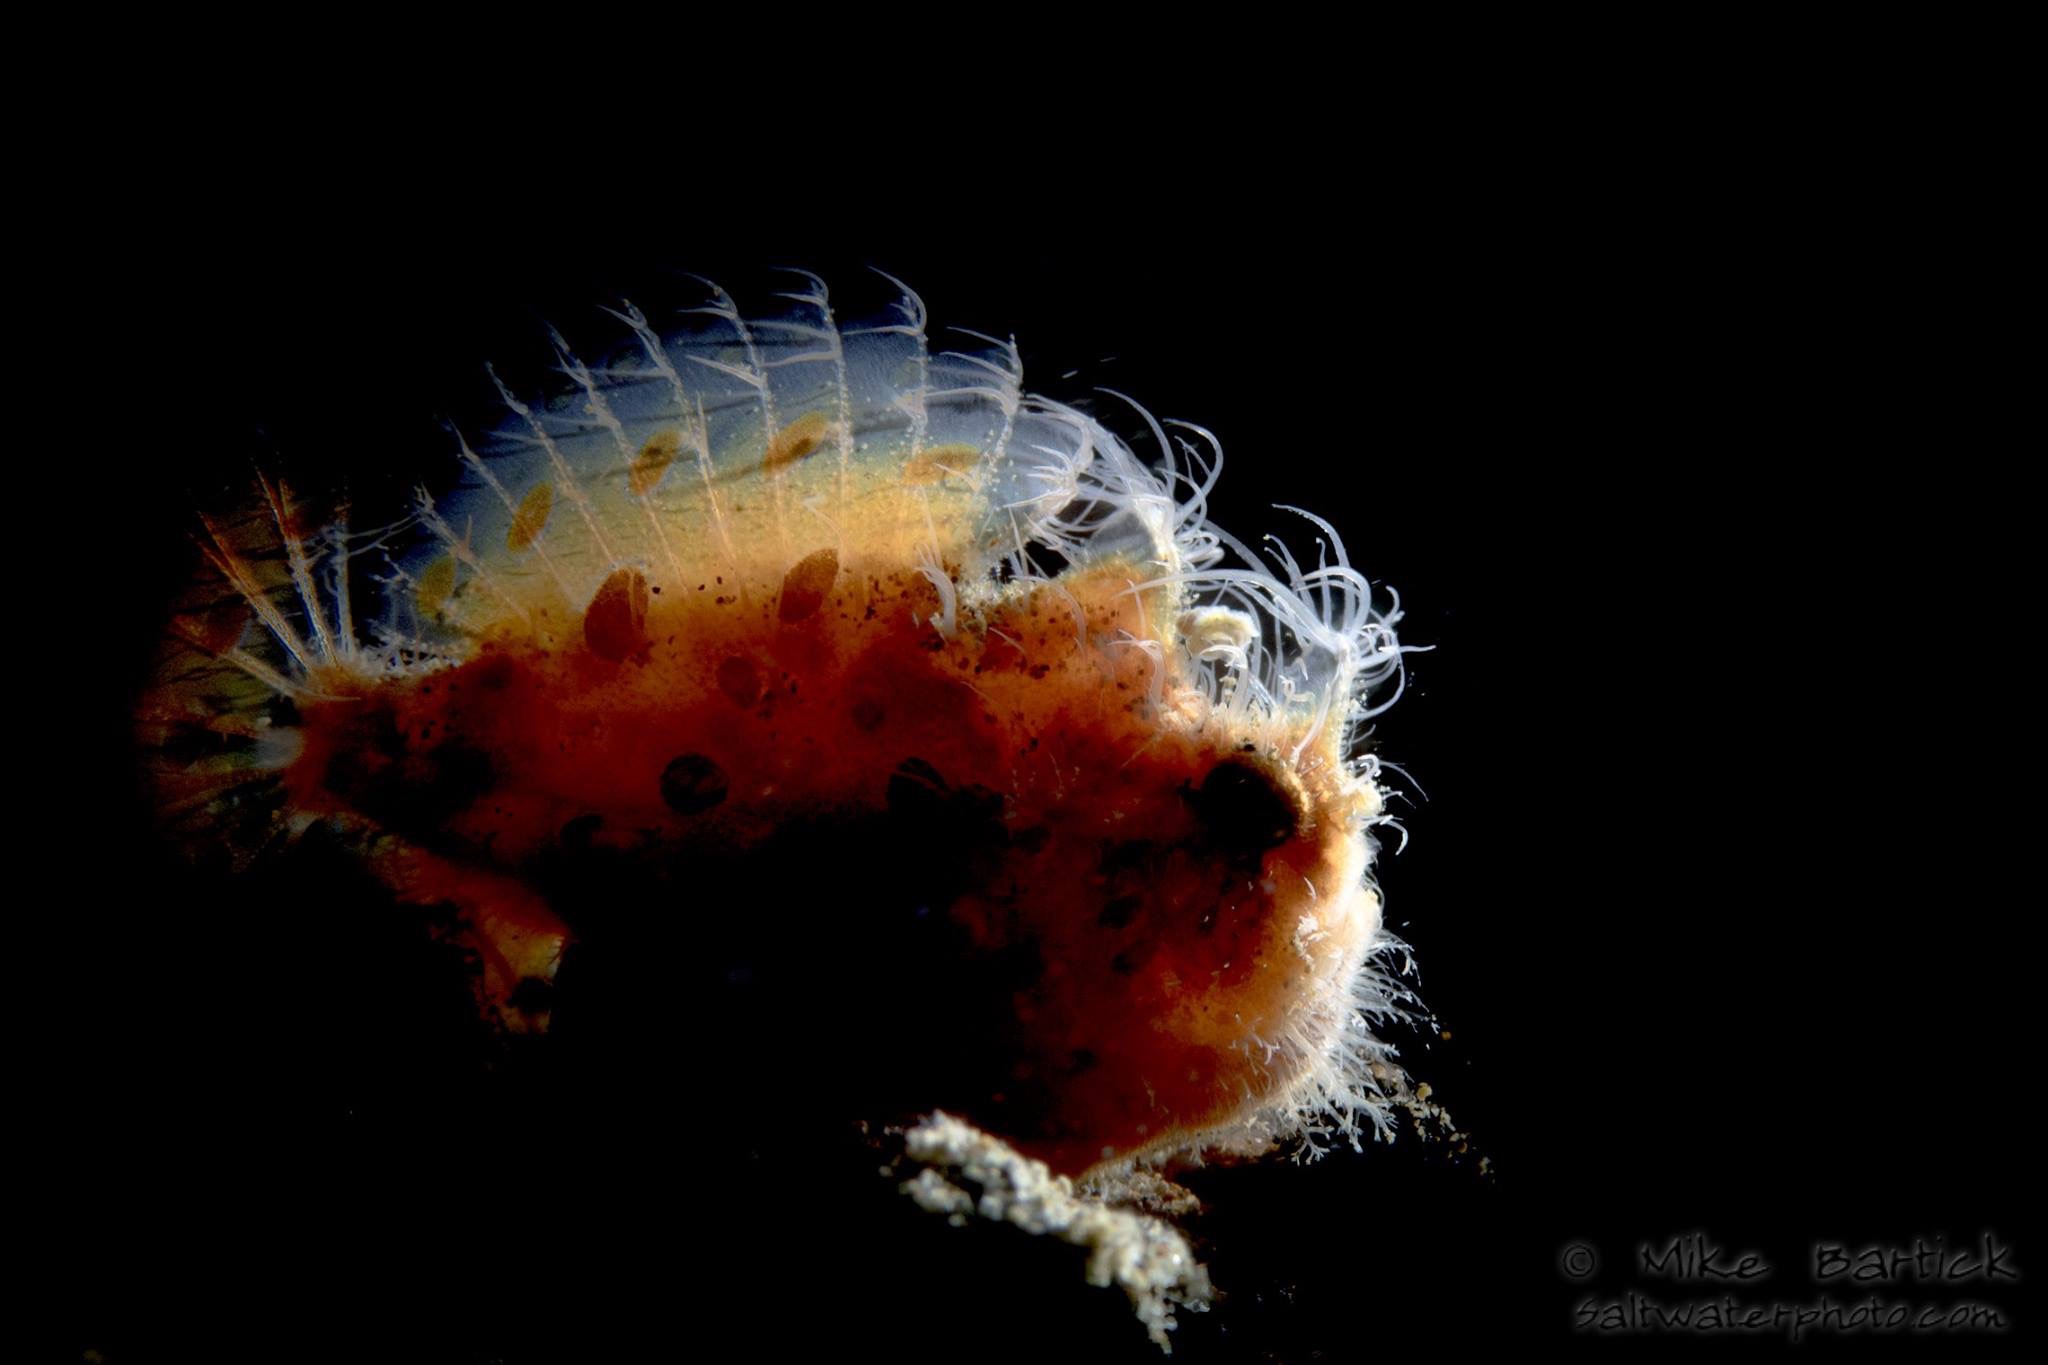
Nikon D7100
105mm
F18 @ 1/320
1 YSD1 Strobe Retra snoot
Special subjects, special lighting. Once the technical aspects of shooting have been mastered then its all about the lighting. When you find a special subject or set out on a trip to capture something different, think about using your snoot.
.jpg)
Nikon D7100
105mm
F22 @ 1/320
1 YSD2 with Retra snoot
Using the snoot to direct your light and further shaping it with the masks provided with the Retra snoot, you can begin to create more then just a ring of light around your subject. The tight beam of light can also be used for shooting a bit further and in a more controlled fashion while delivering the intensity needed for clarity and sharpness in the frame. Experiment..
Nikon D7100
60mm
F13 @ 1/320
1 YSD1-Retra snoot
Don’t shy away from shooting a subject on the move. Once your focal distance is set, continue to track it as it moves along. Some unexpected perks of using a snoot come in the way of eliminating backscatter and the decrease of editing time. This image was shot in a shallow environment as a storm was kicking up. The surge and silt created a bit of a washing machine effect. After 2 minute’s of editing I arrived at this image.
Nikon D7100
105mm
F25 @ 1/320
Using a high shutter speed and low ISO while using a snoot we create black negative space in the frame. For me, i see an opportunity to add something else back into the frame as if it is a blank canvas. I tried this on several subjects to see what i could come up with with mixed results. Experimenting can lead to interesting results.
.jpg)
Nikon D500
105mm
F18 @ 1/200
2 2800K Kraken video lights for backlighting
Backlighting can often times leave a shadow on the important features of your subject, in this case the eye. A snoot will help to add the light back into the frame in a way the doesn’t overpower the backlighting effect. The negative space here being on the eel itself in addition to the rest of the frame. Flashing just the eye, i was able to bring back some color where it was needed the most. As your skills grow you will see how the light can be applied with surgical precision.
Using a quality fiber optic snoot like the one made by Reefnet also has its advantages. The light quality is different enough for me to justify owning and teaching both. The FO base can utilize two snoot’s at the same time, enabling the shooter to deliver light at a different angle and if so desired, different sizes or different areas in the frame. The quick advantages for the FO snoot are backlighting, super macro and off camera lighting. The disadvantage is that its hard to know here the snoot will flash prior to releasing the shutter. There are easy workarounds for this and it quickly becomes a non issue.
.jpg)
Nikon D500
105mm F18 @ 1/200
1 YSD2-J strobe
The light quality differs from one snoot to the next. While an optical snoot delivers a sharp contrast in the fall off of light, the FO snoot create’s a softer edge with less highpoint contrast.
Nikon D500
105mm
F22 @ 1/200
1 YSD2-J FO snoot
Off camera lighting is quite simple with the FO snoot. it isn’t buoyant so setting it in the sand or on a small tripod is a snap. For this shot i simply handheld the strobe with the snoot curving around from behind my subject. Backlighting with the intensity of a strobe flash is far more effective then a torch if it can be done.
.jpg)
Nikon D500
105mm
Kraken +13 Diopter
1 YSD2-J with FO snoot
For supermacro, simply train the snoot tip directly over your diopter or set up the snoot off camera. Once the snoot is in place, then you can concentrate of creating the image rather than concentrating on light placement.
.jpg)
Nikon D500
60mm
CMC diopter
F36 @ 1/200
Keeping the snoot tip in the frame will also create different effects. Making macro images rather then just shooting an image now comes into play. Thinking of the frame as a a blank canvas and creating something completely different is alot of fun. Although not everyone will like the images, they are still fun to create.
.jpg)
Nikon D500
60mm
F18 @ 1/200
1 YSD2-J with FO snoot
1 purple gel colored torch
Adding color into the frame is quite easy to do when using a snoot. Because we’ve created all of that negative space, we can introduce objects, light, colored light and more back into the frame in a controlled fashion. Its fun, challenging and will make your friends scratch their heads!
.jpg)
Nikon D500
105mm
F22 @ 1/200
1 YSD2-J FO snoot
1 Hydra 1K torch backlighting
Snooting the subjects from above and introducing light from behind helped to illuminate the docking station of these amorous slugs. Lighting can either make or break an image. In this case if I used forward strobe flash, the transparent portions of the slug would be lost. Instead, i snooted from the top and backlit them with a torch. Its not uncommon for me to spend an entire dive working with a single subject. Not to say i shoot the entire time but waiting for the right moment often pays off.
At the end of the day, there really is no magic bullet to learning how to use a snoot. The best way to learn is by doing. Don’t let yourself become discouraged and don’t be afraid to experiment. Most importantly, be kind to the critters and always have fun!